Your event landing page gets 500 visits and 47 people register. That’s a 9% conversion rate, and the registration form is almost always why. People land on the page excited about your conference, workshop, or meetup, then hit a 15-field form asking for their job title, mailing address, and dietary preferences before they’ve even committed to showing up.
A well-designed event registration form collects what you need without scaring people off. The trick is knowing which fields earn their place and which ones silently kill your signup rate.
Start by separating must-haves from nice-to-haves
Before you open any form builder, list every piece of information you think you need. Then cut that list in half.
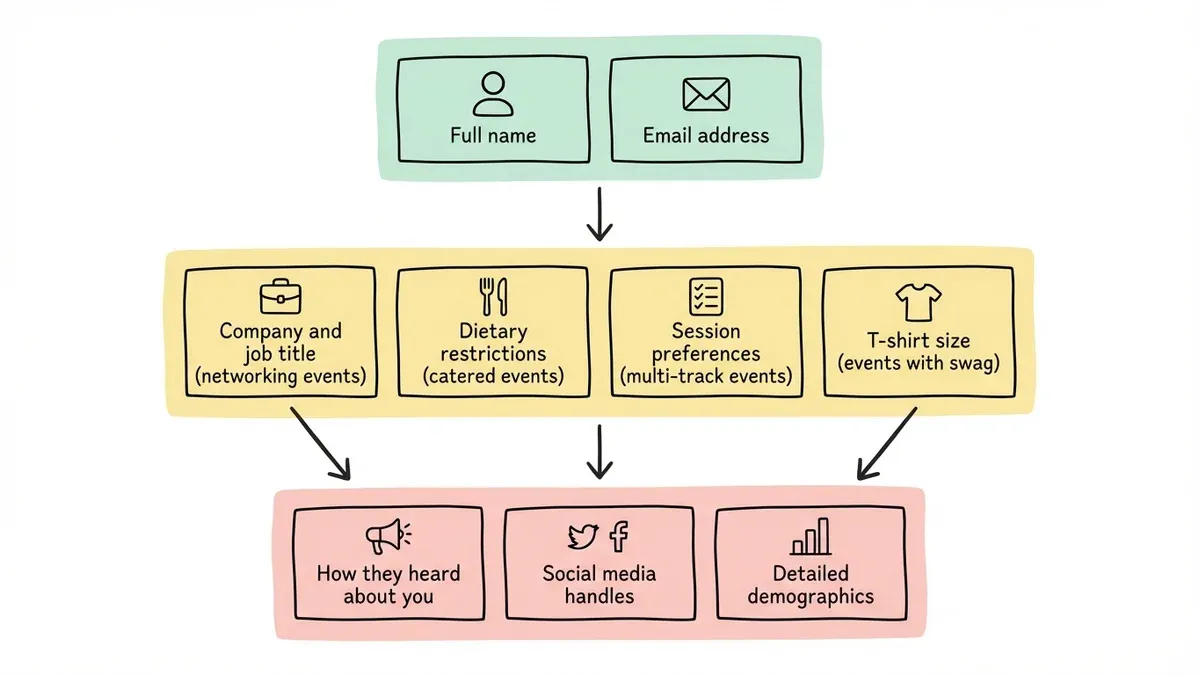
Must-have for almost every event:
- Full name
- Email address
Useful for specific event types:
- Company and job title (networking events and conferences)
- Dietary restrictions (catered events only)
- Session or track preferences (multi-track events)
- T-shirt size (events with swag)
Can wait until after registration:
- How they heard about you
- Social media handles
- Detailed demographics
Here’s the math: reducing form fields from 4 to 3 can increase conversions by 50%. Every field you add should justify itself against that cost. If you won’t use the data to improve the attendee experience or measure event success, leave it out. You can always collect extras through a follow-up email a week before the event.
Match your form to your event type
A 200-person tech conference and a 20-person yoga workshop need very different forms. Don’t copy a template blindly.
Professional conferences often need company and title information because attendees expect curated networking. That’s a legitimate reason to add those fields. Workshops might need skill-level assessments so you can group participants. Food-focused events absolutely need dietary restriction fields, but only ask once registration is otherwise confirmed, not upfront.
Virtual events have their own requirements: time zone preferences, technical setup questions, and platform familiarity. But resist the urge to add all of these at registration. A pre-event email three days before handles technical prep better than a longer signup form.
The goal is matching form complexity to actual need, not hypothetical need.
Pick a form builder that won’t limit you
Not every form builder handles event registration well. You need a few specific things:
Your registration form should match your event branding. Custom colors, fonts, and logo placement matter because this form is often the first real interaction people have with your event.
Multi-page support helps too. Longer registration forms convert better when split across pages. A 3-page form with 3 fields each feels more manageable than a single page with 9 fields.
Mobile responsiveness is non-negotiable. A large chunk of registrations happen on phones, often right after someone sees your event promoted on social media. If the form doesn’t work well on a 6-inch screen, you’re losing those impulse signups.
You’ll want sharing options: direct link, embed on your event website, popup triggered by a button click, or a QR code for printed materials.
Fomr handles all of these on the free plan, with no limits on responses, which matters for events where registration volume is unpredictable. Conditional logic (coming soon) and payment collection (coming soon) will make event forms even more flexible.
Structure your form like a conversation
Think about how you’d ask someone to register in person. You wouldn’t open with “What are your dietary restrictions?” You’d start with their name.
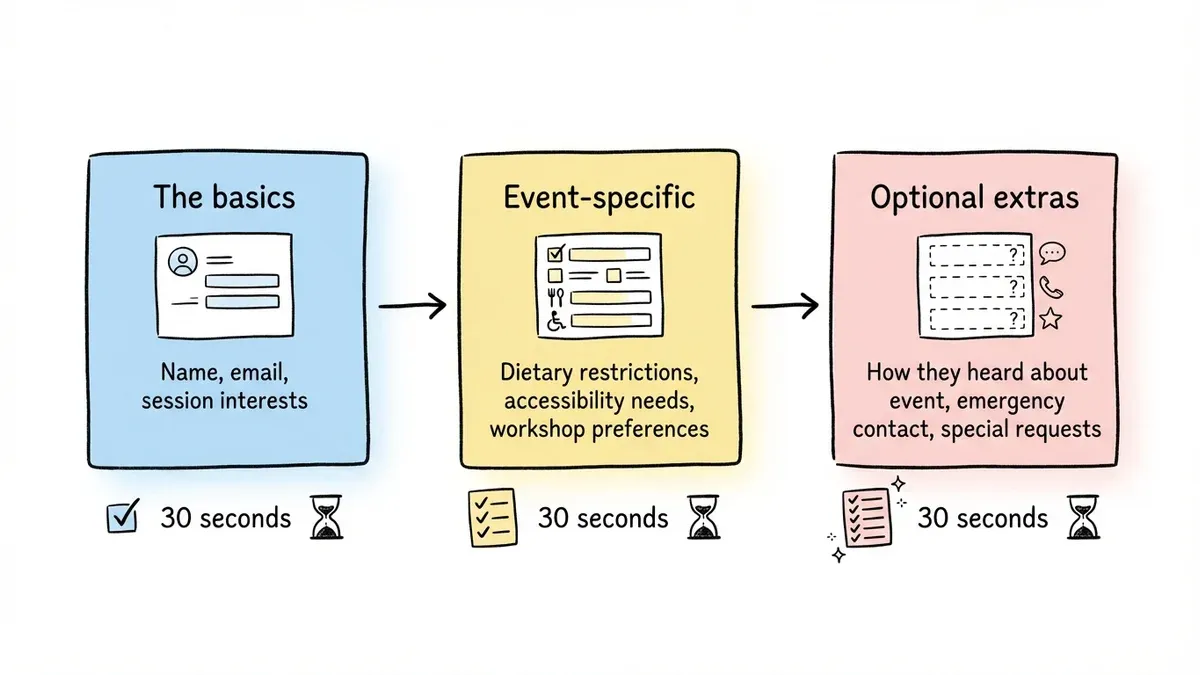
Page 1: The basics
- Name and email
- Which sessions or tracks interest them (if applicable)
Page 2: Event-specific details
- Dietary restrictions (for catered events)
- Accessibility needs
- Workshop or breakout preferences
Page 3: Optional extras
- How they heard about the event
- Emergency contact (for outdoor or physical events)
- Special requests
This structure uses progressive disclosure, revealing complexity gradually as people demonstrate commitment. Someone who’s filled out pages 1 and 2 is already invested. They’re far more likely to complete page 3 than they would be if you’d put everything on a single screen.
The easy, non-threatening fields come first. Sensitive or optional information comes last. Each page should take under 30 seconds to complete.
Write field labels that reduce confusion
Vague labels create hesitation. Hesitation causes abandonment. Be specific about what you want and why you want it.
Instead of “Name,” write “Full name (as you’d like it on your badge).” Instead of “Company,” write “Company or organization (optional).” Instead of “Phone,” write “Phone number (for event-day emergencies only).”
The parenthetical explanations do two things: they tell people exactly what format you want, and they justify why you’re asking. “Dietary restrictions (so we can accommodate your lunch preferences)” answers the unspoken question “Why do you need to know this?”
Mark required fields clearly, but more importantly, question whether each field truly needs to be required. The fewer required fields, the higher your conversion rate. An optional field with good placeholder text like “LinkedIn profile (helps other attendees connect with you)” often gets filled out voluntarily because you’ve explained the benefit.
Choose the right components for event-specific questions
Different questions need different input types. Getting this right reduces friction and improves data quality.
For single-choice questions, use radio buttons or dropdowns:
- Session tracks
- Meal preferences (Vegetarian / Vegan / Standard / Other)
- Attendance type (In-person / Virtual)
For multiple-choice questions, use checkboxes:
- Workshop selections
- Dietary restrictions (Gluten-free, Nut allergy, Dairy-free)
- Networking interests
Use date pickers for events with flexible scheduling or multi-day attendance options. Don’t make people type dates manually. You’ll end up with “Oct 3,” “10/3,” and “October 3rd” all in the same dataset.
Rating scales work well for experience-level assessments. “Rate your familiarity with Python from 1-5” is faster to answer and easier to analyze than an open text field.
Optimize for conversions, not just completeness
A form that collects every possible data point but only 30 people fill out is worse than a simpler form 300 people complete. Here are specific ways to reduce friction.
Enable browser auto-fill. Use standard HTML field attributes so browsers can populate name, email, and address fields automatically. Don’t use unusual field names that break auto-complete. It’s one of the fastest ways to annoy someone filling out a form on their phone.
Use smart defaults. If your event is in Chicago and 90% of registrants are local, default the country to United States and the state to Illinois. Pre-select the most popular session track if you have one.
Create urgency without being manipulative. “Only 23 spots remaining” works when it’s true. “Early bird pricing ends Friday” works when it’s true. Don’t fabricate scarcity. People see through it, and it damages trust.
Test before you launch
Before sharing your event registration form with the world, run through these checks:
Complete the form yourself on a phone. Not a tablet, not a resized browser, an actual phone. Time yourself. If it takes more than 2 minutes, simplify.
Check every field on every page. Do dropdowns work? Do required fields catch empty submissions? Does the date picker behave correctly?
Verify your confirmation message. After someone registers, they should see a clear confirmation with the event date, time, and location, plus what happens next. A vague “Thanks for submitting!” leaves people wondering if their registration actually went through.
Plan the post-registration experience
Your form’s job isn’t done when someone clicks the register button. The confirmation experience sets expectations and reduces no-shows.
Immediate confirmation should include:
- Clear statement that registration succeeded
- Event date, time, and location
- What happens next (confirmation email, calendar invite, etc.)
- Contact information for questions
Follow-up emails that reduce no-shows:
- Confirmation email with calendar file (immediately)
- Event prep details and what to bring (1 week before)
- Final reminder with logistics (1 day before)
- Post-event feedback request (1 day after)
Mistakes that quietly kill registration rates
Treating registration like a survey. Your registration form collects logistics information. Your post-event survey collects opinions. Don’t combine the two.
Ignoring mobile users. Over 50% of registrations happen on phones. Test on phones.
Skipping accessibility. Proper color contrast, clear field labels, keyboard navigation, and screen reader compatibility aren’t optional. They’re how you make sure everyone can register for your event.
Overwhelming people with choices. If you have 20 workshop sessions, group them by theme or experience level. A flat list of 20 checkboxes triggers decision paralysis.
Start building your event registration form
The best event registration forms are short, clear, and designed for phones. Get those right and you’ll see a meaningful increase in signups.
Everything else builds on that foundation.
Try building your registration form in Fomr — no account required. You get unlimited forms and responses on the free plan, multi-page support, and 1,700+ fonts to match your event branding.