You’re planning an event and need to know who’s coming. Simple enough, right? Send out invitations and wait for responses. But here’s the problem: generic RSVP requests buried in email text get ignored. People forget to reply. You end up guessing attendance numbers and either ordering too much food or running out.
A well-designed RSVP form solves this. It makes responding effortless for your guests while giving you the exact information you need to plan successfully. We’ll walk through building one that actually works.
Why RSVP forms beat email replies
Email RSVPs create friction. Your guests have to remember to reply, figure out what information to include, and deal with formatting their response. Many just don’t bother.
An RSVP form removes all that friction. Click a link, answer a few questions, submit. Done. You get structured data instead of parsing through dozens of email replies with different formats and missing information.
The numbers back this up. Event planners report 40-60% higher response rates with dedicated RSVP forms compared to “reply to this email” requests. Your guests prefer them too — no awkward email composition required.
Step 1: Choose your RSVP form builder
You need a form builder that makes creating and sharing forms simple. Look for these features:
- Drag-and-drop editor so you can build without coding
- Mobile-responsive design since many guests will respond on their phones
- Customization options to match your event’s style
- Easy sharing via link or embed
- Response management to track who’s coming
We built Fomr specifically for this type of use case. You can create unlimited forms on our free plan, customize the design completely, and share via link or embed on any website. The drag-and-drop editor gives you full control over layout and styling.
Step 2: Plan your RSVP form structure
Before you start building, decide what information you actually need. The key is asking for enough to plan properly without overwhelming your guests.
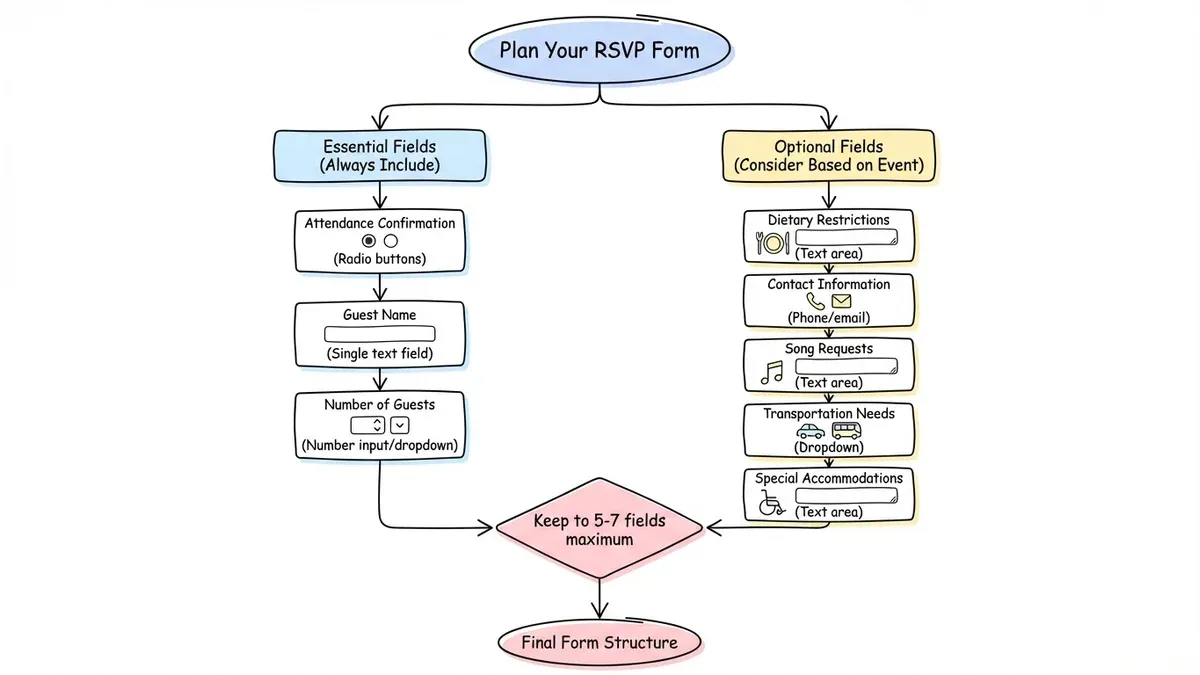
Essential fields for any RSVP form
Attendance confirmation: The core question. Use radio buttons with clear options like “Yes, I’ll be there” and “Sorry, can’t make it.”
Guest name: Full name so you know who responded. Use a single text field rather than separate first/last name fields to reduce friction.
Number of guests: If you’re allowing plus-ones, ask how many people they’re bringing total (including themselves). Use a number input or dropdown with realistic options.
Optional fields to consider
Dietary restrictions: Essential for catered events. Use a text area so people can explain specific needs.
Contact information: Phone number or email if you don’t already have it. Mark these as optional unless truly necessary.
Song requests: For weddings or parties with DJs. Fun addition that guests enjoy filling out.
Transportation needs: For events with limited parking or shuttle services.
Special accommodations: Wheelchair access, childcare needs, etc.
Keep your form to 5-7 fields maximum. Every additional question reduces completion rates.
Step 3: Design your RSVP form for maximum responses
Form design directly impacts response rates. A cluttered, confusing form gets abandoned. A clean, professional one gets completed.
Make the form scannable
Use clear section headings to break up your form. Group related questions together. For example:
- Your RSVP (attendance, guest count)
- Event Details (dietary restrictions, transportation)
- Just for Fun (song requests, special messages)
Leave plenty of white space between sections. Dense forms feel overwhelming.
Choose the right field types
Radio buttons for attendance: Clear visual distinction between yes/no options. Avoid dropdowns for this critical question.
Number inputs for guest count: Prevents invalid entries like negative numbers or text.
Text areas for open-ended questions: Dietary restrictions and special requests need space for detailed responses.
Dropdowns for long lists: If you’re offering multiple meal options, use a dropdown to save vertical space.
Style for your event
Match your form’s visual design to your event. Use your event colors, fonts, and any logos or graphics from your invitations. This creates a cohesive experience and reinforces the event details.
With Fomr, you can choose from 1,700+ fonts, set custom colors, add background images, and upload your logo. The instant preview shows exactly how your form will look as you design it.
Step 4: Write clear RSVP form copy
The words on your form matter as much as the design. Clear, friendly copy gets better responses than formal or vague language.
Form title and description
Make your form title specific: “Sarah & Mike’s Wedding RSVP” not just “RSVP Form.” Include key event details in the description:
“Please respond by March 15th for our wedding on April 20th at Riverside Gardens. We can’t wait to celebrate with you!”
Field labels and help text
Write labels that tell people exactly what to enter:
- “Full name” instead of “Name”
- “Total number of guests (including yourself)” instead of “How many?”
- “Any dietary restrictions or food allergies?” instead of “Dietary needs”
Use help text for complex questions. Under a transportation field, add: “We’ll have shuttles running from downtown hotels every 30 minutes.”
Confirmation message
Write a warm confirmation message that appears after submission:
“Thanks for your RSVP! We’re so excited to see you on April 20th. You’ll receive a reminder email one week before the event with final details.”
Step 5: Set up RSVP form sharing and tracking
How you share your form affects response rates. Make it as easy as possible for people to find and complete.
Sharing options
Direct links: The simplest option. Copy the form URL and include it in emails, texts, or social media posts. Use a clear call-to-action like “RSVP here by March 15th: [link]”
Website embedding: If you have a wedding website or event page, embed the form directly. Guests can RSVP without leaving your site.
QR codes: Perfect for printed invitations. Guests scan with their phone and go straight to the form.
Social media: Share the link in Facebook event pages or Instagram stories.
Response tracking
Check responses regularly to follow up with non-responders. Most form builders let you export responses to spreadsheets for easy planning.
Set up email notifications so you know immediately when someone RSVPs. This lets you send personal thank-you messages or follow up on special requests quickly.
Step 6: Test your RSVP form before sending
Always test your form before sharing it widely. Fill it out yourself on both desktop and mobile. Check that:
- All fields work correctly
- The form displays properly on phones
- Confirmation messages appear
- You receive the response data as expected
- Required fields actually prevent submission when empty
Ask a friend or family member to test it too. Fresh eyes catch issues you might miss.
Common RSVP form mistakes to avoid
Making too many fields required: Only mark attendance and name as required. Everything else should be optional.
Using confusing attendance options: “Yes” and “No” are clearer than “Accepts with pleasure” and “Regretfully declines.”
Forgetting mobile optimization: 60% of people will open your form on their phone. If it doesn’t work well on mobile, they won’t complete it.
Not setting a clear deadline: Tell people exactly when you need responses. “Please RSVP by March 15th” is better than “RSVP soon.”
Asking for information you already have: Don’t ask for email addresses if you’re sending the form via email.
Making the form too long: Every additional field reduces completion rates. Be ruthless about what you actually need.
Following up on RSVP responses
Your work doesn’t end when responses come in. Good follow-up improves the guest experience and helps your event planning.
Send confirmation emails to everyone who RSVPs yes. Include event details, directions, and your contact information for questions.
Follow up with non-responders one week before your deadline. A gentle reminder often catches people who meant to respond but forgot.
For complex events, send reminder emails with final details one week before. Include parking information, dress code reminders, and any last-minute updates.
RSVP form templates to get started
Here are three proven RSVP form structures for common events:
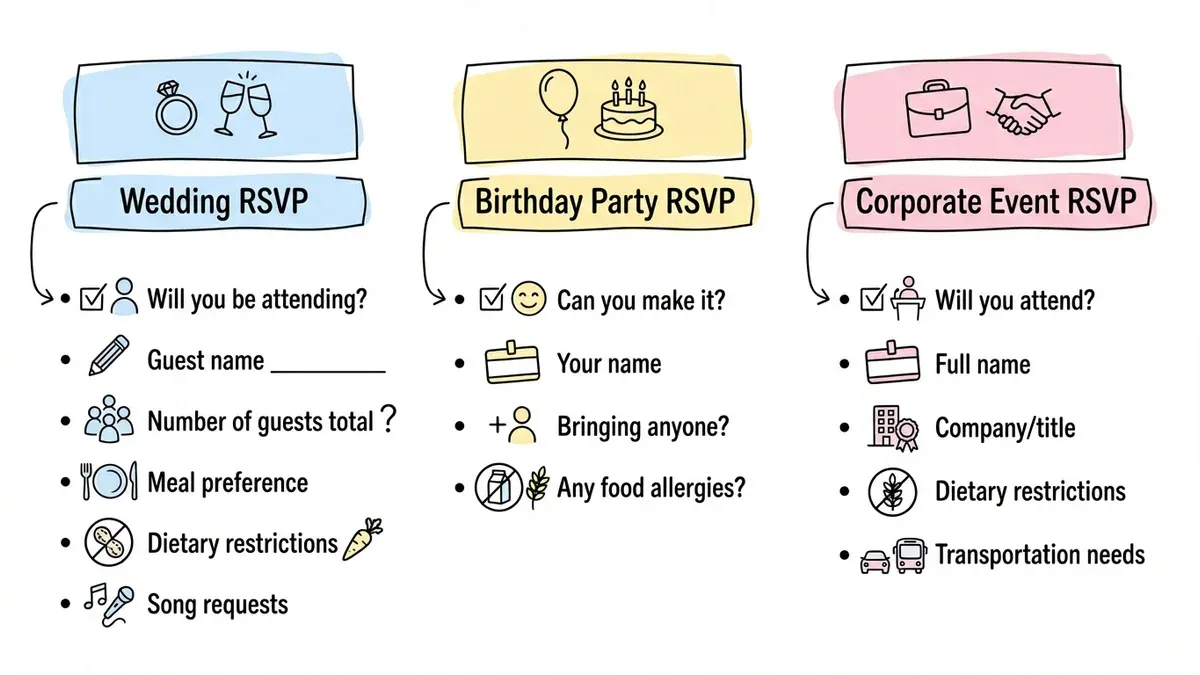
Wedding RSVP
- Will you be attending? (Yes/No)
- Guest name
- Number of guests total
- Meal preference (if serving dinner)
- Dietary restrictions
- Song requests
Birthday party RSVP
- Can you make it? (Yes/No)
- Your name
- Bringing anyone? (Yes/No + number)
- Any food allergies?
Corporate event RSVP
- Will you attend? (Yes/No)
- Full name
- Company/title
- Dietary restrictions
- Transportation needs
Make RSVP collection effortless
A well-designed RSVP form transforms event planning from stressful guesswork into organized preparation. Your guests get a simple way to respond, and you get the structured information needed to plan successfully.
The key is keeping it simple: ask only what you need, design for mobile, and make completing the form as effortless as possible. Test everything before sending, and follow up appropriately with both responders and non-responders.
Ready to build your RSVP form? Try Fomr’s guest editor — you can create and customize a complete form in minutes without even creating an account. It’s free, mobile-optimized, and gives you full design control to match your event perfectly.