Your new hire’s first impression of your company starts with paperwork. A clunky, confusing employee onboarding form signals disorganization before they’ve even stepped foot in the office. A well-designed one shows you care about details and respect their time.
Most companies throw together a basic contact form with a few extra fields and call it done. But effective onboarding forms do more than collect information — they set expectations, reduce first-day anxiety, and help new employees feel prepared and welcomed.
Here’s how to build an employee onboarding form that actually serves both you and your new hires.
Why employee onboarding forms matter
The numbers tell the story: companies with strong onboarding processes improve new hire retention by 82% and productivity by over 70%. Your onboarding form is the first touchpoint in that process.
A good employee onboarding form accomplishes three things:
Collects essential information before day one. Personal details, emergency contacts, tax forms, direct deposit information — everything HR needs to get payroll and benefits set up without scrambling on the first day.
Sets clear expectations. New hires learn about dress code, start times, what to bring, and who they’ll meet. This reduces first-day jitters and helps them show up prepared.
Creates a professional first impression. A thoughtfully designed form shows attention to detail and suggests the company has its act together.
Step 1: Plan your information architecture
Before you touch any form builder, map out what information you actually need. Most onboarding forms suffer from kitchen-sink syndrome — they ask for everything “just in case” instead of focusing on essentials.

Start with these core categories:
Personal information: Full name, preferred name, address, phone number, email, emergency contacts. Keep this section straightforward — it’s data you need for HR systems.
Employment details: Start date, position title, department, manager name, work location. This helps with scheduling and workspace setup.
Administrative requirements: Tax withholding forms (W-4), direct deposit details, benefits enrollment deadlines. Group these together since they’re all “paperwork” in the new hire’s mind.
Practical logistics: Parking instructions, building access, dress code, first-day schedule. This is where you reduce anxiety and set expectations.
Optional preferences: Dietary restrictions for team lunches, preferred communication style, short-term goals. These help managers personalize the experience but shouldn’t be required.
Write out each section before building anything. This prevents the common mistake of adding fields as you go, which creates a disjointed user experience.
Step 2: Choose the right form builder
Your employee onboarding form will be seen by every new hire, so it needs to look professional and work reliably. Free form builders like Google Forms feel amateur for something this important. You need more design control.
Look for these features:
Multi-page capability. Onboarding forms are long by nature. Breaking them into logical sections (Personal Info → Employment Details → Benefits) makes them less overwhelming.
File upload support (coming soon). New hires often need to submit documents like ID copies or signed agreements. Make sure your form builder handles this securely.
Professional design options. Your form should match your company’s visual identity. Look for custom fonts, colors, and the ability to add your logo.
Mobile-friendly interface. People increasingly fill out forms on their phones, especially if they’re between jobs and don’t have constant computer access.
A drag and drop form builder makes creating and modifying your onboarding form much easier, especially when you need to update information or add new sections.
Step 3: Structure your employee onboarding form flow
The order of your form sections affects completion rates. Start with easy, familiar information and save potentially sensitive items for later once people are committed to finishing.
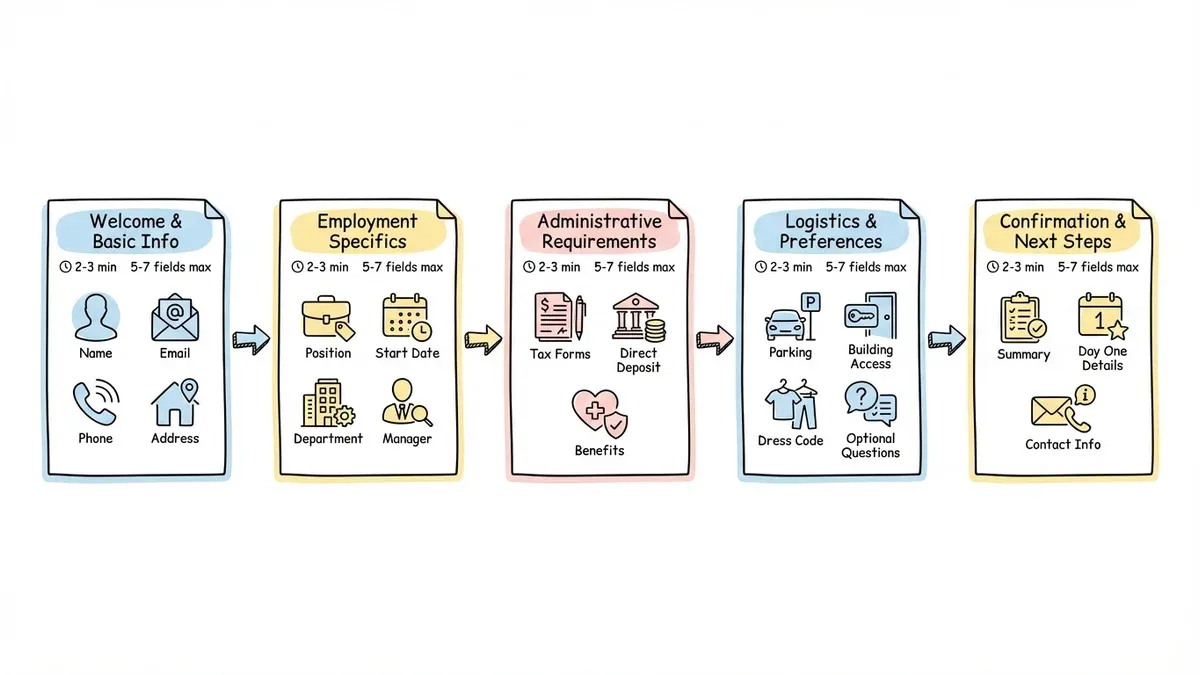
Page 1: Welcome and basic information Start with a warm welcome message that includes the person’s name and position. Then collect basic contact information — name, email, phone, address. This section should take 2-3 minutes maximum.
Page 2: Employment specifics Position details, start date, department, manager. Include any role-specific questions here, like whether they’ll need equipment or have client-facing responsibilities.
Page 3: Administrative requirements Tax forms, direct deposit, benefits enrollment. This is the “paperwork” section that people expect to be tedious. Group it together so they can power through it.
Page 4: Logistics and preferences Practical information like parking, building access, dress code. End with a few optional questions about communication preferences or dietary restrictions.
Page 5: Confirmation and next steps Summarize what happens next, who they’ll meet on day one, and any items they should bring. Include contact information if they have questions.
Keep each page to 5-7 fields maximum. More than that feels overwhelming, especially on mobile devices.
Step 4: Write clear, welcoming copy
Your form copy sets the tone for the entire onboarding experience. Avoid HR jargon and write like you’re talking to a friend who just got the job.
Use welcoming language. “We’re excited to have you join the team!” feels better than “Please complete the following required fields.”
Explain why you need information. Instead of just “Emergency contact,” write “Emergency contact (so we can reach someone if needed).” People are more willing to share when they understand the purpose.
Be specific about requirements. “Upload a photo of your driver’s license (front only)” is clearer than “Provide identification.”
Set realistic time expectations. “This form takes about 10-15 minutes to complete” helps people plan when to fill it out.
Address common concerns upfront. Add a note like “All information is kept confidential and used only for employment purposes” to ease privacy worries.
Avoid corporate speak like “utilize,” “facilitate,” or “ensure optimal.” Write like a human talking to another human.
Step 5: Design for completion
Visual design affects form completion rates more than most people realize. A cluttered, hard-to-read form signals that the company doesn’t pay attention to details.
Use plenty of white space. Cramped forms feel overwhelming. Give each section room to breathe.
Group related fields visually. Use section headers and subtle background colors to separate different types of information.
Make required fields obvious. Use asterisks or “required” labels consistently. Don’t make people guess what they can skip.
Choose readable fonts. Stick to clean, professional fonts that work well on both desktop and mobile. Avoid decorative fonts that might look unprofessional.
Add your company logo. This reinforces that the form is official and legitimate, which matters for security-conscious new hires.
Use progress indicators. Multi-page forms should show “Page 2 of 5” or a progress bar so people know how much is left.
Test your form on both desktop and mobile before sending it to anyone. A form that looks great on your computer might be unreadable on a phone.
Step 6: Handle sensitive information carefully
Employee onboarding forms collect personal information that requires careful handling. New hires need to trust that their data is secure.
Be transparent about data use. Include a brief privacy statement explaining how you’ll use and protect their information.
Use secure form builders. Make sure your online form builder uses HTTPS encryption and meets basic security standards. Free form builders often lack proper security measures.
Limit access appropriately. Only HR personnel and direct managers should see completed forms. Set up user permissions accordingly.
Follow legal requirements. Different states and countries have different rules about what you can ask during hiring. Consult with legal counsel if you’re unsure.
Provide alternative submission methods. Some people prefer to submit sensitive documents in person rather than through an online form. Offer that option.
Never ask for information you don’t actually need. Every additional field increases both completion time and security risk.
Step 7: Test and refine your process
Before rolling out your employee onboarding form company-wide, test it thoroughly with a small group.
Do a walkthrough yourself. Fill out the entire form as if you were a new hire. Time how long it takes and note any confusing sections.
Test on different devices. Try the form on desktop, tablet, and mobile. Check that all fields work properly and text remains readable.
Get feedback from recent hires. Ask people who recently joined what information they wish they’d known earlier or what parts of the process felt unclear.
Monitor completion rates. If people are starting but not finishing your form, you might need to shorten it or fix technical issues.
Track common questions. If new hires frequently email with the same questions after completing the form, add that information to the form itself.
Plan to update your onboarding form quarterly. Company policies change, new tools get adopted, and feedback reveals improvement opportunities.
Common mistakes to avoid
Making everything required. Only mark fields as required if you truly need that information before day one. Optional fields for preferences and additional details are fine.
Asking for information too early. Don’t request bank account details until after someone has signed their offer letter. Build trust first.
Forgetting about mobile users. Test your form on actual phones, not just by resizing your browser window. The experience is different.
Using unclear field labels. “Preferred name” is clearer than “nickname.” “Home address” is clearer than “address.”
Overwhelming with choices. If you offer 50 different health insurance plans, provide a summary document rather than listing them all in the form.
Ignoring accessibility. Use proper form labels and make sure your form works with screen readers. Some of your new hires may have disabilities.
Not providing context. Explain what happens after they submit the form and when they can expect follow-up communication.
Make onboarding smoother with the right tools
A well-designed employee onboarding form transforms a stressful administrative process into a welcoming first impression. The key is focusing on what new hires actually need to know while making the experience as smooth as possible.
Ready to create an onboarding form that makes great first impressions? Try our drag-and-drop form builder — no signup required. You can build, customize, and test your entire employee onboarding form in minutes, with all the design control and professional features your HR process deserves.