Getting employees to submit expense reports shouldn’t feel like pulling teeth. Yet most companies struggle with incomplete forms, missing receipts, and frustrated staff who’d rather eat the cost than deal with another clunky expense report form.
The problem isn’t lazy employees — it’s bad form design. A well-built expense report form can turn a dreaded monthly chore into a quick 5-minute task. Here’s how to create one that people actually want to use.
Why your current expense report form isn’t working
Most expense report forms fail because they’re built by finance teams who understand accounting but not user experience. They cram every possible field onto one overwhelming page, use confusing labels, and offer no guidance on what information is actually required.
The result? Employees abandon half-completed forms, submit incomplete information, or avoid claiming expenses altogether. Your finance team spends hours chasing down missing details, and everyone ends up frustrated.
A good expense report form fixes this by being clear, fast, and forgiving. It guides users through the process step by step, explains what’s needed, and makes it easy to attach supporting documents.
Step 1: Plan your expense report form structure
Before you start building, map out what information you actually need. Not what you might want someday — what you need to process and approve expenses today.
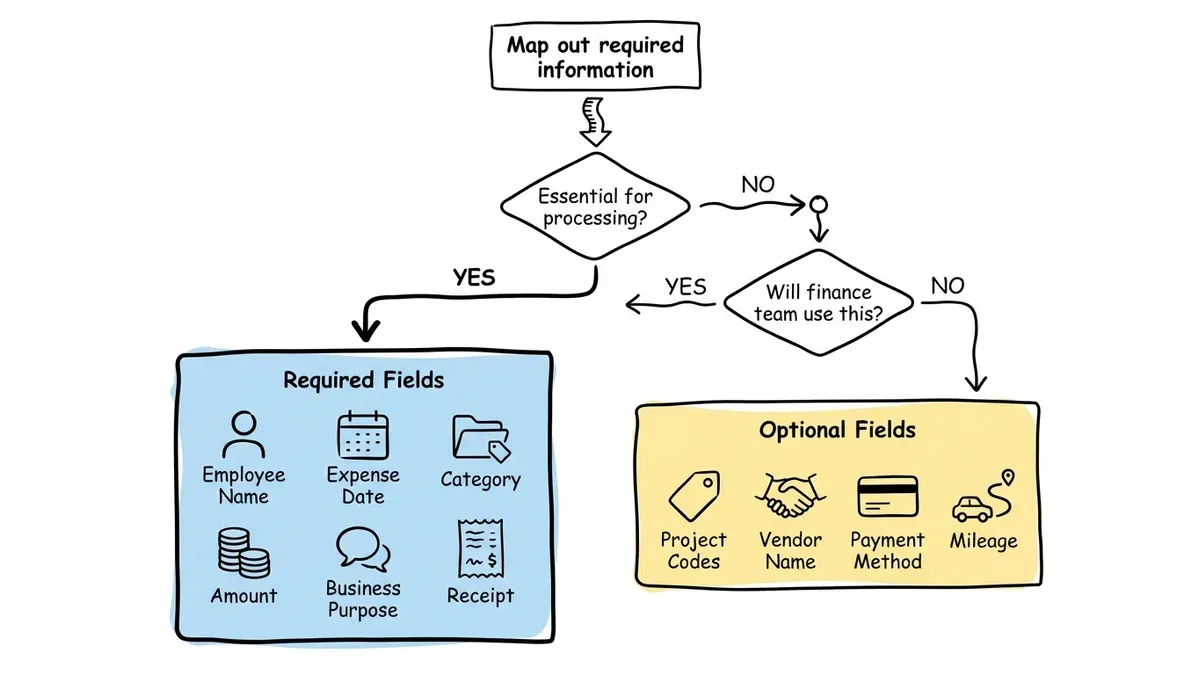
Essential fields for any expense report form:
- Employee name and department
- Expense date
- Expense category (meals, travel, supplies, etc.)
- Amount spent
- Business purpose
- Receipt attachment
Nice-to-have fields (add only if you’ll use them):
- Project or client code
- Vendor name
- Payment method
- Mileage details for travel expenses
Start with the essentials. You can always add fields later, but removing them after launch confuses users who’ve already learned your system.
Pro tip: Survey your finance team about which missing information causes the most delays. Those pain points become required fields.
Step 2: Choose the right form builder for expense reports
Your expense report form needs specific features that basic contact forms don’t require. Look for a form builder that supports:
- File uploads for receipt attachments (coming soon)
- Conditional logic to show relevant fields based on expense type (coming soon)
- Multi-page layouts to break complex forms into digestible steps
- Mobile optimization since many employees submit expenses on their phones
- Data export to integrate with your accounting system
We built Fomr specifically for forms like this — ones that need to look professional while handling complex workflows. Our drag and drop form builder includes multi-page layouts and mobile optimization, plus 1,700+ fonts and full design control so your expense report form matches your company branding.
Step 3: Design your expense report form layout
Start with a multi-page approach. Even if your form only has 8-10 fields, spreading them across 2-3 pages makes the process feel manageable.
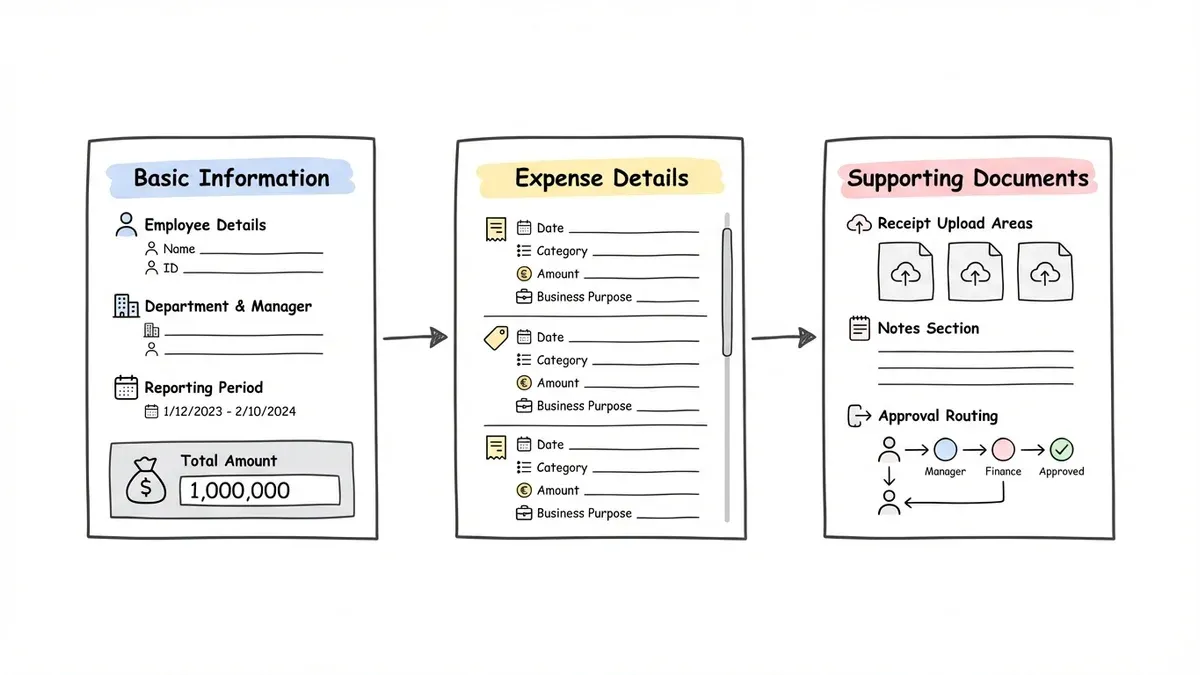
Page 1: Basic information
- Employee details (name, department, manager)
- Reporting period
- Total amount (if known)
Page 2: Expense details
- Individual expense entries
- Categories and amounts
- Business purposes
Page 3: Supporting documents
- Receipt uploads
- Notes
- Approval routing
Use clear, conversational labels instead of accounting jargon. “What did you spend money on?” works better than “Expense classification category.” Your employees aren’t accountants — write for humans.
Visual hierarchy matters. Use larger text for section headers, group related fields together, and add plenty of white space. A cramped form feels overwhelming even when it’s short.
Step 4: Set up smart field validation
Validation prevents errors before they happen, but bad validation creates frustration. Here’s how to get it right:
Required field rules:
- Mark truly essential fields as required
- Use inline validation that checks fields as users complete them
- Provide specific error messages (“Please enter an amount” beats “Field required”)
Format validation:
- Accept multiple date formats (3/15/26, March 15, 2026, 15-Mar-26)
- Allow currency symbols or plain numbers for amounts
- Don’t force specific receipt file formats — accept JPG, PNG, PDF
Smart defaults:
- Pre-fill employee information from your directory
- Set today’s date as the default expense date
- Remember frequently used expense categories
The goal is catching genuine mistakes while being flexible about input formats. Your form should feel helpful, not pedantic.
Step 5: Build in expense categories and conditional logic
Most companies have different requirements for different expense types. Business meals need client information, travel expenses need destination details, and supply purchases need vendor names.
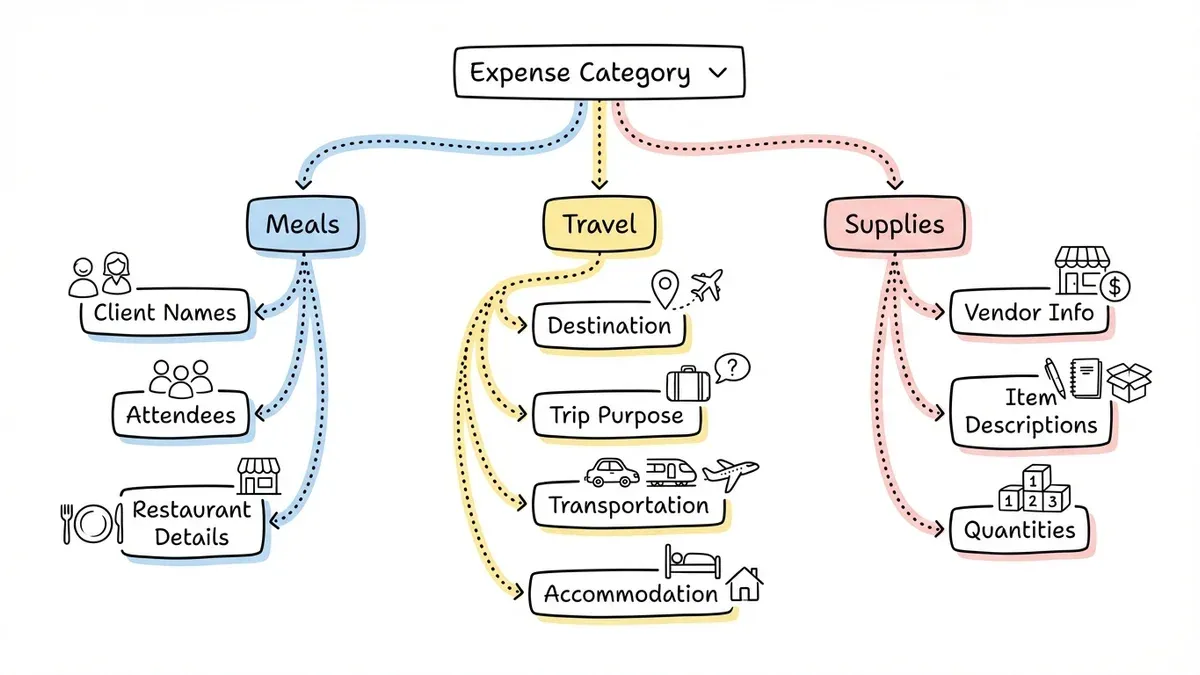
Use conditional logic to show relevant fields based on expense category:
For meal expenses:
- Client or colleague names
- Number of attendees
- Restaurant name and location
For travel expenses:
- Destination
- Trip purpose
- Transportation method
- Accommodation details
For supply purchases:
- Vendor information
- Item descriptions
- Quantity purchased
This keeps your form clean while capturing the specific information your finance team needs for each expense type. Users only see fields that apply to their situation.
Step 6: Optimize for mobile submission
Over 60% of expense reports are submitted on mobile devices, usually right after the expense occurs. Your expense report form must work perfectly on phones.
Mobile optimization checklist:
- Large, thumb-friendly input fields
- Minimal typing required
- Easy photo upload for receipts
- Progress indicators so users know how much is left
- Auto-save functionality in case of interruptions
Test your form on actual phones, not just desktop browser windows made narrow. The mobile experience should feel native and fast, not like a desktop form crammed onto a small screen.
Step 7: Add helpful guidance and examples
Most expense report errors happen because employees don’t understand what information to provide. Build guidance directly into your form:
Use placeholder text effectively:
- “e.g., Client lunch with ABC Corp” for business purpose fields
- “Enter amount without currency symbol” for money fields
- “Select the date you made the purchase” for expense dates
Add contextual help:
- Tooltip explanations for complex fields
- Links to your expense policy
- Examples of acceptable vs. unacceptable expenses
Receipt requirements:
- Specify minimum image quality
- List acceptable file formats
- Explain what information must be visible
Clear expectations prevent confusion and reduce back-and-forth with your finance team.
Common expense report form mistakes to avoid
Mistake 1: Making everything required Only mark fields as required if you literally cannot process the expense without that information. Over-requiring fields creates abandonment.
Mistake 2: Using accounting terminology “GL codes,” “cost centers,” and “expense classifications” mean nothing to most employees. Use plain language or provide clear explanations.
Mistake 3: No progress indication Long forms without progress bars feel endless. Users give up because they don’t know how much work remains.
Mistake 4: Ignoring mobile users A form that’s hard to use on phones gets abandoned. Since people often submit expenses immediately after purchases, mobile optimization isn’t optional.
Mistake 5: No confirmation or next steps After submission, tell users what happens next. When will they hear back? Who reviews their expenses? How do they track approval status?
Testing and refining your expense report form
Launch with a small group first. Pick 10-15 employees from different departments and ask them to submit real expenses using your new form. Watch for:
- Where do people get stuck or confused?
- Which fields get skipped most often?
- How long does completion actually take?
- What questions do users ask during the process?
Use this feedback to refine field labels, add missing guidance, or restructure confusing sections. A week of testing prevents months of frustrated users.
Analytics to track:
- Completion rate (how many people who start actually finish)
- Time to complete
- Most common error messages
- Mobile vs. desktop usage patterns
Integration and workflow considerations
Your expense report form is just the beginning of your expense management workflow. Consider how submitted data flows to your finance team:
Export and integration options:
- CSV export for spreadsheet-based workflows
- REST API and webhooks for accounting workflows (coming soon)
- Email notifications to managers for approval
- Automated routing based on expense amounts
Approval workflows:
- Automatic approval for small amounts
- Manager review for mid-range expenses
- Finance team approval for large purchases
- Escalation paths for policy questions
Plan these workflows before launching your form. The best expense report form in the world won’t help if submitted data sits in digital limbo.
Ready to build your expense report form?
A well-designed expense report form transforms a frustrating process into a quick, painless task. Focus on user experience first — make it easy for employees to submit complete, accurate information. The administrative benefits follow naturally.
Start building your expense report form today with our drag and drop form builder. You can create, test, and launch a professional form in under 30 minutes, with no coding required. Try it free without signing up and see how simple expense reporting can be.