
Most website owners assume they need a developer to add a form to their site. You don’t. Whether you’re running a WordPress blog, a Squarespace portfolio, or a hand-coded HTML page, there are three reliable ways to put a form on your website, and none of them require writing backend code or managing a database.
The three methods: embed a form using a widget, link to a hosted form, or build one in raw HTML. Each has trade-offs. This guide covers all three so you can pick the one that fits your situation and get it done in under 20 minutes.
Method 1: Embed a form with a widget
This is the most popular approach, and for good reason. You build your form in a dedicated form builder, then drop a small snippet of code into your website. The form renders directly on your page, visitors fill it out without leaving, and responses go to your form builder’s dashboard.
Why embedding works well
Embedded forms keep visitors on your page. That matters because every redirect is a chance for someone to drop off. According to Unbounce research, keeping users on the same page during a conversion action can improve completion rates significantly. The form feels like part of your site rather than a detour.
Embedding also gives you design control. A good form builder lets you match fonts, colors, and spacing to your site’s look, so the form doesn’t stick out like a third-party widget from 2012.
How to do it
The general process is the same regardless of which form builder you use:
- Build your form in the builder’s editor
- Go to the share or embed settings
- Copy the embed code (usually a script tag plus a container element)
- Paste it into your website’s HTML where you want the form to appear
- Publish and test
Here’s what the embed code looks like with Fomr. Add the script to your page’s <head>:
<script async src="https://fomr.io/widget/embed.js"></script>Then place a div wherever you want the form to show up:
<div data-fomr-id="YOUR_FORM_ID"></div>That’s two lines. The form loads asynchronously (so it won’t slow down your page), adapts to the container width, and works on mobile without extra configuration. If you want a popup form instead of an inline one, check out our popup forms guide for the full setup.
Other form builders use similar patterns. Typeform and Jotform provide iframe-based embeds. Google Forms gives you an iframe too, though the styling options are limited. The key difference is whether you get an iframe (which is essentially a page-within-a-page) or a native JavaScript widget that renders directly in your DOM. JavaScript widgets tend to look cleaner and resize better.
Pros and cons of embedding
What works well: the form lives on your page, visitors don’t leave, you get full design control, and it works on any platform that lets you add custom HTML.
What’s less ideal: you’re dependent on the form builder’s uptime. If their servers go down, your form disappears. This is rarely an issue with established tools, but it’s worth knowing. You also need to be comfortable pasting a code snippet, though “comfortable” here means “can copy and paste two lines.”
Method 2: Link to a hosted form
If you don’t want to touch your website’s code at all, you can create a form in any builder and share it as a standalone link. The form lives on the builder’s domain (or a custom domain if you set one up), and you just link to it from your site.
When linking makes sense
Linking is the right call in a few specific situations:
- You’re using a website builder that restricts custom HTML (some Wix and Squarespace plans limit what you can embed)
- The form is long or complex enough that it deserves its own page, like a multi-page job application or a detailed survey
- You want to share the same form across multiple channels: website, email, social media, QR codes
A hosted form also loads independently from your site, which means your page speed stays exactly the same. For sites where every millisecond of load time matters (e-commerce, for example), this can be a real advantage.
How to do it
- Build your form in any form builder
- Copy the share link (it’ll look something like
https://fomr.io/s/abc123orhttps://forms.google.com/...) - Add a link or button on your website that points to that URL
- Optionally, set up a custom domain so the form URL matches your brand
The link approach works everywhere. WordPress, Squarespace, Wix, Webflow, Shopify, a static HTML site, an email newsletter. If you can add a hyperlink, you can add a form.
Pros and cons of linking
What works well: zero code changes to your site, the form loads on its own page (fast), easy to share across channels, and you can update the form without touching your website.
What’s less ideal: visitors leave your site to fill out the form. That redirect creates friction, and some people won’t click through. You also lose the visual integration, since the form page looks like the form builder’s design, not your site. Custom domains help with the branding issue but don’t solve the redirect problem.
Method 3: Build a form in raw HTML
This is the old-school approach. You write the HTML <form> element, style it with CSS, and handle submissions with a backend or a form endpoint service.
When raw HTML makes sense
Honestly? For most people, it doesn’t. If you’re a developer who wants complete control over every pixel and behavior, or if you have very specific requirements that no form builder supports, then raw HTML is the way to go. For everyone else, a form builder will get you a better result in a fraction of the time.
We wrote a full breakdown of how to create a form without coding that covers why the no-code route has gotten so much better. The short version: modern form builders handle validation, mobile responsiveness, spam protection, and data storage automatically. Replicating all of that in raw HTML takes real effort.
A basic HTML form
If you do want to go this route, here’s what a minimal contact form looks like:
<form action="https://your-endpoint.com/submit" method="POST">  <label for="name">Name</label>  <input type="text" id="name" name="name" required>
  <label for="email">Email</label>  <input type="email" id="email" name="email" required>
  <label for="message">Message</label>  <textarea id="message" name="message" rows="5" required></textarea>
  <button type="submit">Send</button></form>
That gives you a functional form, but it’s unstyled, has no spam protection, doesn’t validate beyond basic HTML5 checks, and needs a backend to receive submissions. Services like Formspree or Basin can handle the backend part, so you don’t need to set up a server. But you’ll still need to write CSS to make it look decent and add JavaScript if you want client-side validation.
Pros and cons of raw HTML
What works well: total control over markup and behavior, no third-party dependencies, no external scripts loading on your page.
What’s less ideal: you’re responsible for everything. Styling, validation, spam filtering, mobile responsiveness, accessibility, data storage. For a simple contact form, that might be manageable. For anything more complex, you’re building a form builder from scratch.
Platform-specific instructions
The embed process varies depending on your website platform. Here’s how to add a form to the most popular ones.
WordPress
WordPress gives you the most flexibility. You have three options:
Custom HTML block. In the Gutenberg editor, add a “Custom HTML” block to any page or post. Paste your form’s embed code directly into it. This works with any form builder’s embed snippet.
Theme file editing. If you want the form in your header, footer, or sidebar, you can add the embed code to your theme’s template files. Go to Appearance > Theme File Editor and paste the script tag in header.php and the form container wherever you need it. Be careful here, since a typo can break your site. Use a child theme if possible.
Page builder plugins. If you’re using Elementor, Divi, or Beaver Builder, each has an HTML or code widget. Drag it onto your page and paste the embed code. This is often the easiest option for WordPress users who aren’t comfortable editing raw HTML.
WordPress also has dedicated form plugins like WPForms and Gravity Forms, but those lock your forms to WordPress. If you ever switch platforms, you’ll need to rebuild everything. An external form builder with an embed code travels with you.
Squarespace
Squarespace is more restrictive than WordPress, but embedding still works.
Edit your page and add a Code Block (not a Markdown block, which strips scripts). Paste your form builder’s embed code into the code block. Make sure “Display Source” is unchecked, then save.
One gotcha: Squarespace strips certain HTML attributes and scripts on some plans. If your embed code doesn’t render, check that your plan supports custom code injection. Business and Commerce plans have full code injection support. Personal plans are more limited.
For site-wide forms (like a newsletter signup in the footer), use Squarespace’s code injection feature under Settings > Advanced > Code Injection. Paste the script tag in the header injection area and the form container in the footer injection area.
Wix
Wix has its own form builder built in, but it’s fairly basic. To embed an external form:
Add an HTML iframe element from the Wix editor (Add > Embed > Custom Element or HTML iframe). Paste your embed code into it. Resize the element to fit your form.
Wix’s iframe approach can be finicky with height. If your form gets cut off or shows scrollbars, you’ll need to manually adjust the iframe height. Some form builders handle this better than others. JavaScript-based widgets (like Fomr’s) that communicate their height to the parent page tend to resize more reliably than static iframes.
Webflow
Webflow is developer-friendly, so embedding is straightforward.
Add an Embed element from the components panel. Paste your form’s embed code. The form renders right in the Webflow designer, so you can see how it looks before publishing.
Webflow also lets you add custom code to the <head> of any page (Page Settings > Custom Code). Put the script tag there and the form container in an embed element on the page. This keeps things clean and ensures the script loads before the form tries to render.
One thing I like about Webflow: it doesn’t strip or modify your embed code. What you paste is what gets rendered. That’s not always true on other platforms.
Which method should you pick?
Here’s a quick decision framework:
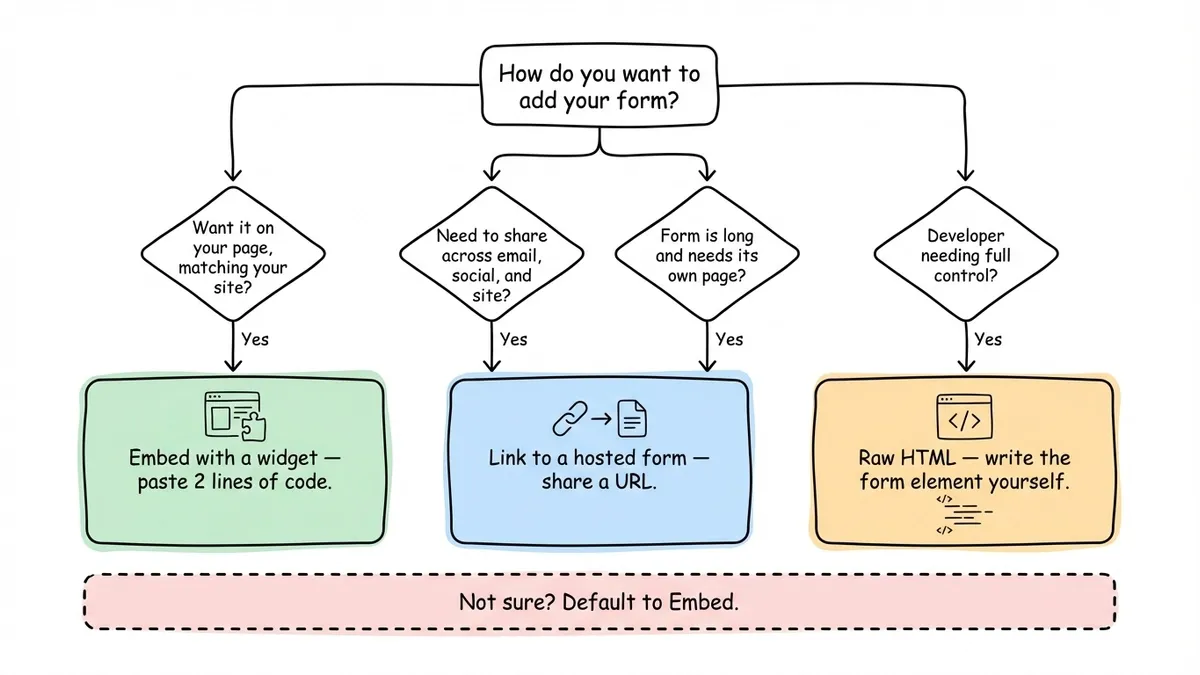
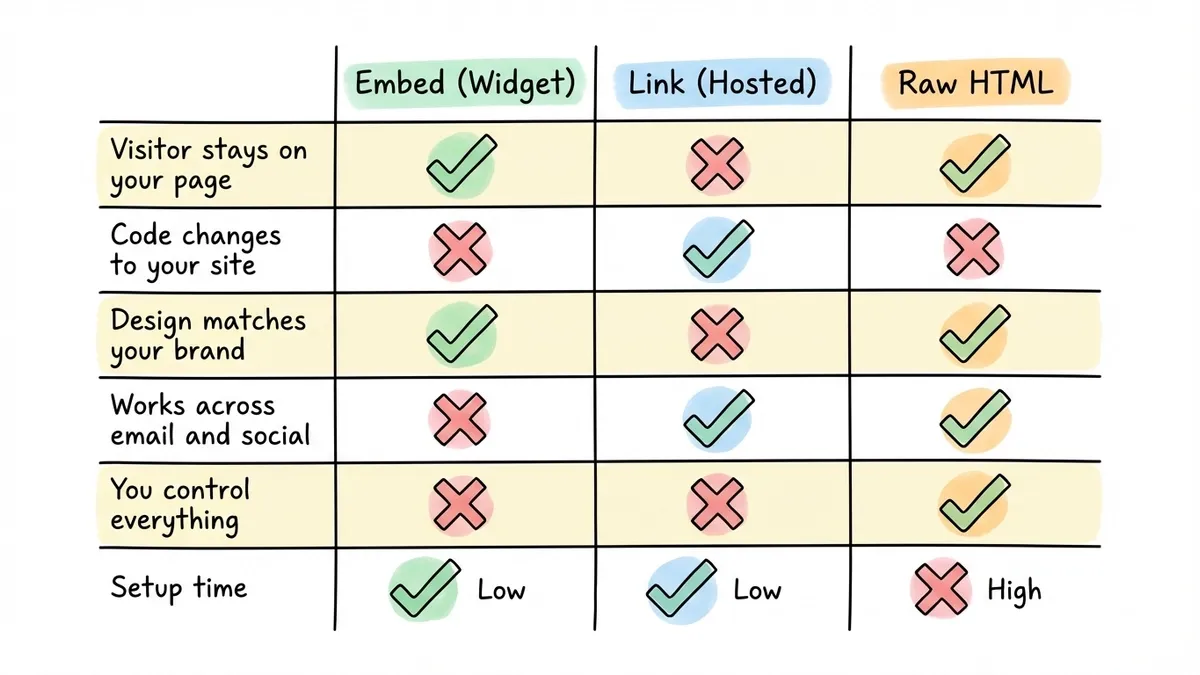
| Situation | Best method |
|---|---|
| You want the form on your page, looking like part of your site | Embed with a widget |
| You need to share the form across email, social, and your site | Link to a hosted form |
| The form is long and deserves its own dedicated page | Link to a hosted form |
| You’re a developer who wants full control | Raw HTML |
| You’re not sure and just want something that works | Embed with a widget |
For most people reading this, embedding is the answer. It gives you the best combination of user experience (no redirects), design control (match your brand), and simplicity (two lines of code).
Common mistakes when adding forms to websites
A few things trip people up repeatedly. Avoid these and you’ll save yourself a support ticket or two.
Not testing on mobile. This is the most common problem, full stop. Your form might look perfect on your laptop and be completely unusable on a phone. Over 60% of web traffic is mobile. Test on a real device, not just a browser resize.
Embedding multiple forms on one page. Each form is a decision point. If a visitor sees a contact form, a newsletter signup, and a feedback survey all on the same page, they’re likely to fill out none of them. One page, one form, one clear action.
Forgetting the privacy notice. If you’re collecting personal data (names, emails, phone numbers), you need a privacy statement near the form. In the EU, this is legally required under GDPR. Everywhere else, it’s just good practice. A single line like “We’ll only use this information to respond to your inquiry” is enough.
Ignoring page speed. Some form builders load heavy JavaScript bundles that add seconds to your page load time. Check your page speed before and after adding the form. If it adds more than half a second, consider a lighter alternative or lazy-loading the form.
Using the wrong embed method for your platform. Pasting a script tag into a Markdown block on Squarespace won’t work. Using an iframe on a platform that blocks iframes won’t work. Match the embed method to what your platform actually supports.
After you embed: make sure it actually works
Adding the form is step one. Confirming it works is step two, and too many people skip it.
Submit a test response yourself. Check that the data shows up in your form builder’s dashboard. Open the page on your phone and fill it out with your thumbs. Try it in Safari, not just Chrome. If you have email notifications set up, verify they’re arriving.
If you’re collecting leads or inquiries, set up a process for responding. A form that collects submissions nobody reads is worse than no form at all, because it sets an expectation you’re not meeting.
For a deeper dive into building the form itself, our guide on how to create a contact form covers field selection, copy, and design decisions. And if you want the full technical walkthrough on embedding specifically, how to embed a form on any website goes into more detail on each platform.
Get a form on your site today
You don’t need a developer, a plugin ecosystem, or a weekend of free time. Pick a method, paste some code (or just share a link), and you’re collecting responses.
If you want to try the embed approach, Fomr’s guest editor lets you build a form and grab the embed code without creating an account. The free plan includes unlimited forms and responses, so you can experiment without committing to anything.