Not long ago, building a web form meant writing HTML for the layout, CSS for the styling, JavaScript for validation, and backend code to store the responses in a database. If you wanted something as basic as a contact form, you were looking at a few hours of work minimum. And that assumed you already knew how to code.
That era is over. Today you can create a form without coding in about five minutes, and the result will look better than most hand-coded forms ever did. No HTML, no CSS, no server setup. Just a visual editor, your questions, and a share link.
This guide walks through the entire process, from choosing a tool to publishing a finished form, so you can skip the technical headaches and focus on what you’re actually trying to collect.
The old way: why coding a form was painful
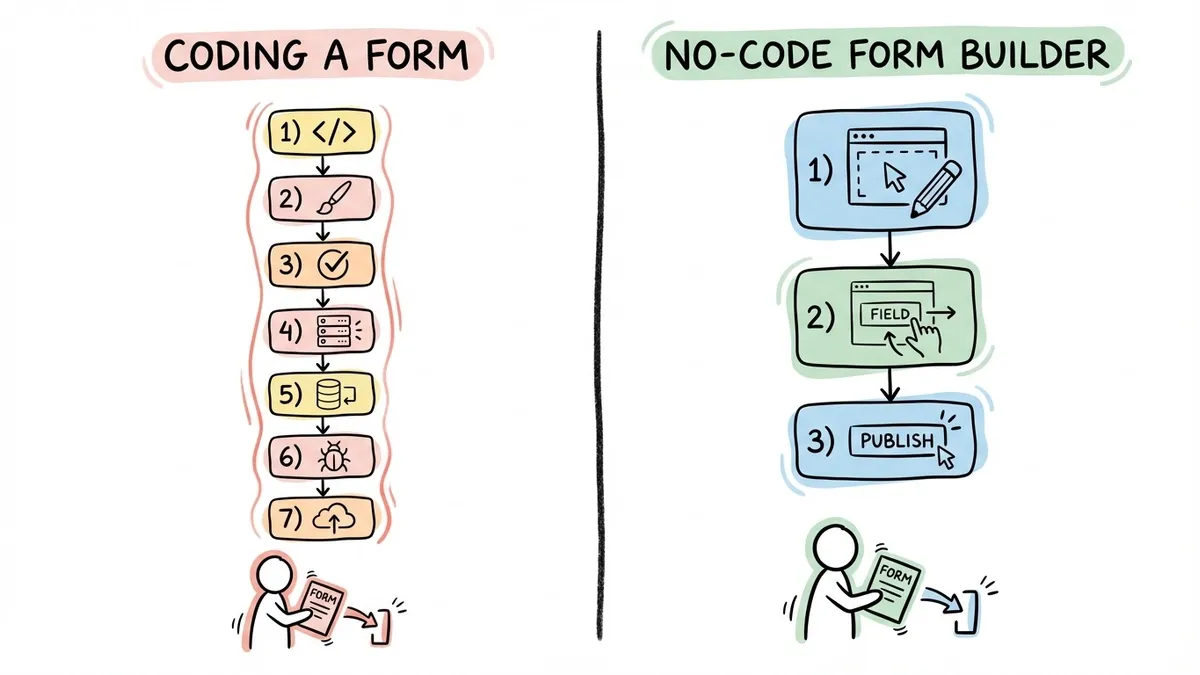
If you’ve never tried to build a form from scratch with code, here’s what the process looked like:
- Write the HTML structure:
<form>,<input>,<label>,<select>,<textarea>, and a<button>to submit - Style it with CSS so it doesn’t look like it was built in 1998
- Add JavaScript to validate inputs (is that email address real? did they fill out the required fields?)
- Set up a backend endpoint to receive the form data
- Connect a database to store responses
- Handle edge cases like duplicate submissions, spam bots, and mobile responsiveness
- Deploy the whole thing to a server
That’s seven steps before a single person fills out your form. And if something breaks after launch, you’re debugging across multiple layers of code.
For developers, this was tedious but doable. For everyone else, it was a wall. Small business owners, marketers, event organizers, teachers, nonprofit coordinators, freelancers: all of these people need forms regularly, and almost none of them should have to learn PHP or JavaScript to get one.
The new way: no-code form builders
A no-code form builder handles all seven of those steps behind the scenes. You work in a visual editor, drag fields where you want them, customize the look, and hit publish. The tool generates the form, hosts it, collects responses, and stores them for you.
Here’s what that means in practice:
- No HTML or CSS. You design the form visually. Pick fonts, colors, backgrounds, and layouts without touching a stylesheet.
- No backend code. Responses go straight to a dashboard. No server to configure, no database to manage.
- No deployment. Your form gets a shareable link the moment you publish it. You can also embed it on a website or generate a QR code.
- No maintenance. The platform handles uptime, security, and mobile responsiveness. You just check your responses.
The trade-off used to be that no-code tools produced ugly, generic-looking forms. That’s changed. Modern drag and drop form builders give you real design control, sometimes more than you’d get writing CSS by hand, because they bundle typography, spacing, and color systems that work together automatically.
We wrote a deeper breakdown of why drag and drop form builders keep winning if you want the full argument. The short version: visual editing matches how people actually think about layout, and it’s dramatically faster.
What you can build without writing code
Before we get into the how, let’s set expectations. A no-code form builder isn’t limited to simple contact forms. Here’s a partial list of what you can create:
- Contact and inquiry forms
- Event registration and RSVP forms
- Customer feedback surveys and NPS surveys
- Job application forms with multi-page flows
- Order forms and booking requests
- Quizzes and polls
- Waitlist signups
- Volunteer applications
- Internal forms like expense reports, time-off requests, and incident reports
Basically, if it involves collecting structured information from people, you can build it without code. The only things that still require developer involvement are deeply custom integrations (like writing data directly to your own database via API) or forms with complex programmatic logic. And even those gaps are closing fast as no-code tools add more features.
Step-by-step: create a form without coding
Let’s walk through building a form from scratch. I’ll use Fomr for this walkthrough because it has a generous free tier (unlimited forms, responses, and fields) and you can start building without even creating an account. But the general process applies to most drag and drop form builders.
Step 1: Open the editor
Head to the form builder and create a new form. In Fomr, you can go straight to the guest editor if you don’t want to sign up yet. You’ll land on a blank canvas with a component panel on the side.
Don’t overthink this step. Just get the editor open. You can always change everything later.
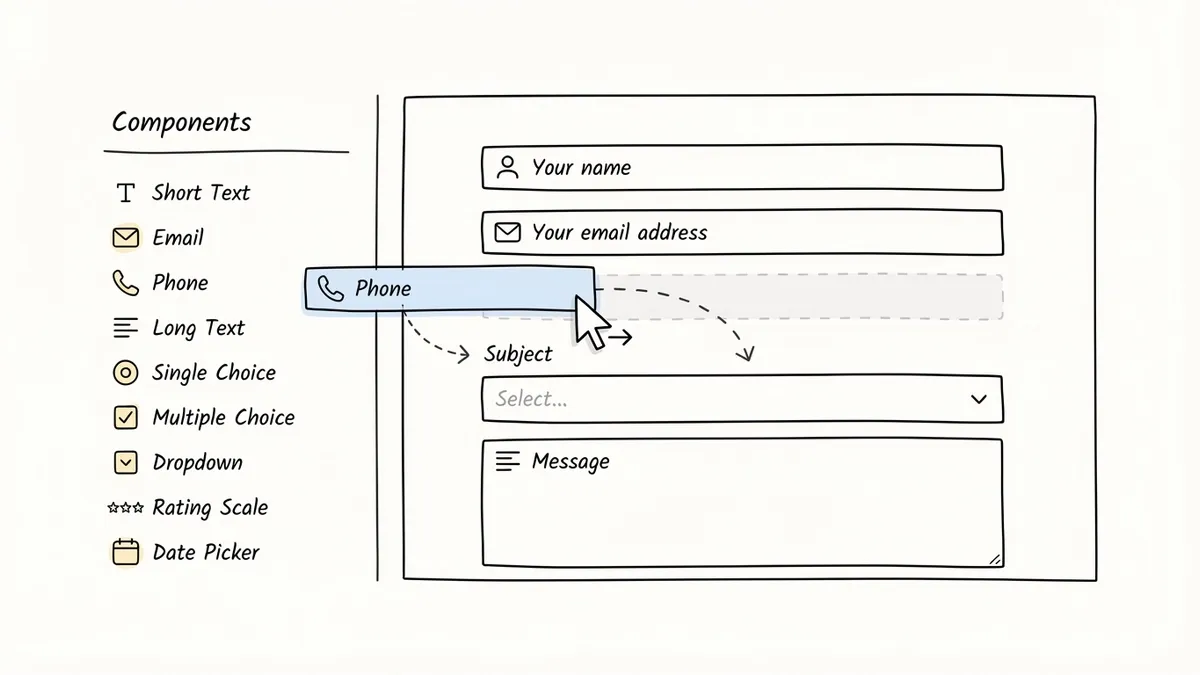
Step 2: Add your fields
Drag components from the panel onto your form. Most builders offer 20-30 field types. The ones you’ll use most often:
- Short text for names, subjects, and brief answers
- Email and phone fields with built-in format validation
- Long text for messages, comments, or open-ended feedback
- Single choice (radio buttons) and multiple choice (checkboxes) for structured options
- Dropdown menus when you have many options but limited space
- Rating scales and opinion scales for satisfaction surveys
- Date and time pickers for scheduling and event forms
Drop them in the order that makes sense for your use case. If you’re building a contact form, that might be: name, email, subject, message. For a registration form, you might start with personal details, then move to preferences or payment info on a second page.
Speaking of pages: most no-code form builders support multi-page forms. If your form has more than six or seven fields, splitting it across pages reduces the feeling of overwhelm and tends to improve completion rates. You can read more about that in our guide on what multi-step forms are and why they work.
Step 3: Configure each field
Click on any field to adjust its settings. The basics:
- Label: The question text your respondents see. Be clear and specific. “Your email address” beats “Email” because it tells people exactly what you’re asking for.
- Placeholder text: The gray hint text inside the field. Use it to show the expected format (“[email protected]”) rather than repeating the label.
- Required vs. optional: Mark fields as required when you genuinely need the data. Every required field adds friction, so be selective. A phone number on a newsletter signup form? Probably optional.
- Validation rules: Email fields should validate email format. Phone fields should accept common formats. Most builders handle this automatically for specialized field types.
One common mistake: making every single field required. People abandon forms that feel demanding. If you’re not sure whether a field should be required, make it optional. You’ll get fewer incomplete submissions and more total responses.
Step 4: Customize the design
This is where no-code form builders have gotten surprisingly good. You’re not stuck with a default white box anymore.
Typography. Pick a font that matches your brand. Some builders offer hundreds of options. Fomr gives you access to over 1,700 Google Fonts, which is more than you’ll ever need, but it means you can match virtually any brand’s typography.
Colors. Set your brand colors for backgrounds, text, buttons, and field borders. Consistent color builds trust. A form that looks like it belongs on your website converts better than one that looks like a third-party tool.
Backgrounds. Solid colors work for most cases, but you can also use images or gradients. Just make sure the text stays readable. High contrast between text and background isn’t optional; it’s an accessibility requirement.
Logo and branding. Add your logo to the header. On free plans, some builders add their own branding to your form. If that bothers you, look for tools where you can remove it on a paid plan, or find one that doesn’t add it at all.
Layout. Some builders let you control field width, spacing, and alignment. You can place two short fields side by side (first name and last name, for example) instead of stacking everything vertically. Small layout decisions like this make forms feel more polished.
The goal isn’t to spend an hour on design. Five minutes of customization, picking your brand font, setting your colors, adding a logo, is enough to make a form look professional and intentional.
Step 5: Set up your thank-you page
After someone submits your form, they see a confirmation screen. Don’t leave this as the default “Thank you for your submission” text. Customize it to:
- Confirm what happens next (“We’ll get back to you within 24 hours”)
- Redirect to a specific URL if that makes more sense for your workflow
- Include a link to another resource, your website, a calendar booking page, or a related form
The thank-you page is an underused opportunity. It’s the one moment when you have someone’s full attention and they’re feeling positive about interacting with you. Use it.
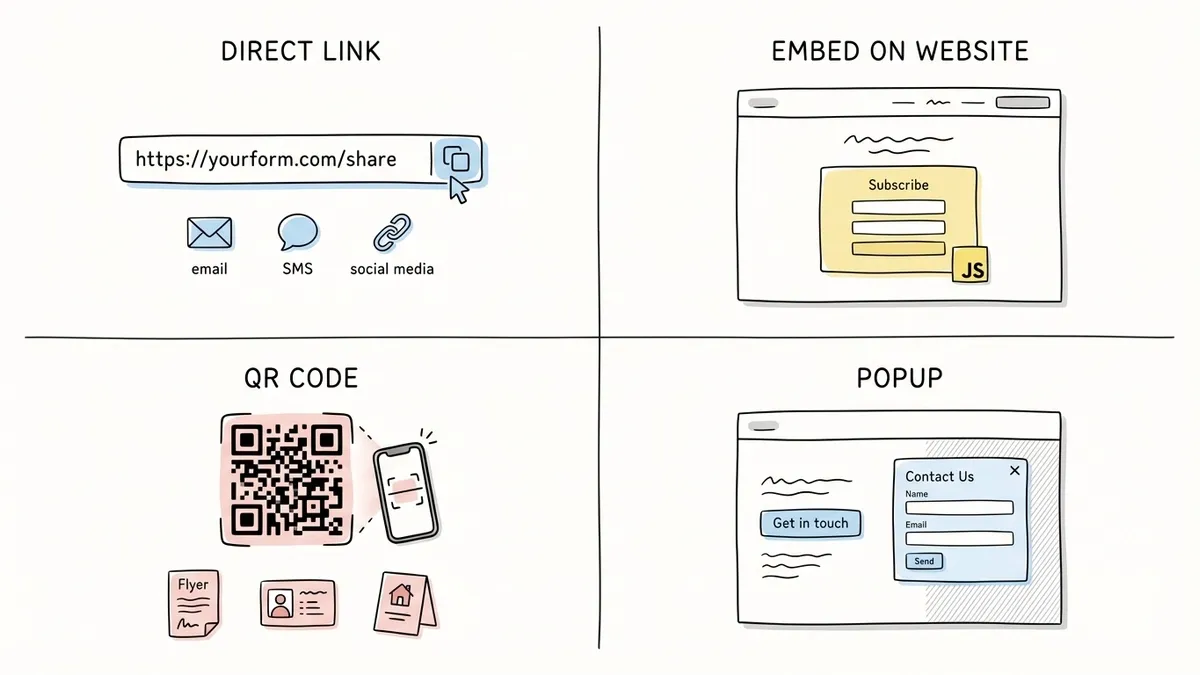
Step 6: Publish and share
Hit publish. Your form gets a unique URL that you can share immediately. But a link isn’t your only option.
Direct link. Copy the URL and send it via email, text, social media, or messaging apps. This is the fastest way to start collecting responses.
Embed on your website. Most form builders generate an embed code you can paste into your site’s HTML. Fomr uses a lightweight JavaScript widget (not an iframe), which means the form loads fast and adapts to your page layout. We have a full guide on embedding forms if you need the details.
QR code. Generate a QR code that links to your form. Print it on flyers, business cards, table tents at events, or product packaging. This is especially useful for in-person data collection where people have their phones but not a laptop.
Popup. Trigger the form as a popup on your website, either on button click or after a time delay. Good for lead capture and feedback collection without dedicating a full page to the form.
What about responses?
Once your form is live, responses flow into a dashboard where you can view, filter, and export them. No database setup, no SQL queries. Most builders show responses in a table format and let you export to CSV or Excel.
Some things to keep in mind:
- Check response limits. Some free plans cap you at 100 or 500 responses per month. If you expect high volume, verify the limits before you launch. Fomr’s free plan has no response limits, which is unusual but genuinely useful if you’re running a survey or event registration that might get hundreds of submissions.
- Set up notifications. Most builders can email you when a new response comes in. Turn this on if you need to respond quickly (like for contact forms or support requests).
- Export regularly. Even if the dashboard is great, keep a local backup of your data. Export to CSV periodically, especially before a plan change or if you’re using a free tier.
Common mistakes to avoid
After watching people build thousands of forms, a few patterns keep showing up:
Asking for too much. Every field you add reduces your completion rate. A Hubspot study found that reducing form fields from four to three increased conversions by almost 50%. Ask yourself: do I really need this field, or am I just collecting it because I can?
Ignoring mobile. Over half of web traffic is mobile. If your form doesn’t work well on a phone, you’re losing submissions. Good no-code builders handle mobile responsiveness automatically, but always preview your form on a phone before publishing.
Skipping the preview. It takes 30 seconds to preview your form as a respondent would see it. Do it. You’ll catch typos, confusing question wording, and layout issues that aren’t obvious in the editor.
Using the default thank-you page. As mentioned above, customize it. A generic confirmation message is a missed opportunity.
Not testing the submission flow. Submit your own form at least once. Make sure the confirmation works, the notification email arrives, and the response shows up in your dashboard. Catching a broken form after you’ve shared it with 200 people is not fun.
When you might still need code
Honesty check: no-code form builders cover 90% of use cases, but there are situations where code is still the right tool.
If you need to write form data directly to your own database in real time, you’ll want an API or webhook integration. If your form requires complex conditional logic with dozens of branching paths, some builders handle this better than others (and some don’t offer it yet). If you need to process payments with custom business logic, a coded solution might give you more control.
That said, the gap keeps shrinking. Features like conditional logic, payment collection, and third-party integrations are rolling out across most major form builders. What required a developer last year might be a checkbox in a settings panel next year.
For the vast majority of forms, though, a no-code builder is faster, cheaper, and produces a better result than coding from scratch. The best free form builders available today would have been premium tools five years ago.
Start building
You don’t need to know HTML, CSS, JavaScript, or any backend language to create a professional form. Pick a no-code form builder, drag your fields into place, customize the design, and publish. The whole process takes minutes.
If you want to try it right now, Fomr’s guest editor lets you build a form without creating an account. No signup, no credit card, no time limit. Just open it and start dragging fields.